NuboCoder – Beaver Builder Simple Module Creator
Build custom Beaver Builder modules — team cards, product tiles, branded testimonial blocks, anything the built-in modules don't cover — with a drag-and-drop visual builder, no PHP required. This guide covers the visual builder, all 9 field types, HTML placeholders, the advanced JSON mode, and the REST API.
On this page
1Overview
NuboCoder – Beaver Builder Simple Module Creator lets you build your own custom modules for Beaver Builder — the same kind of building blocks that show up in the page builder's module panel next to "Heading," "Photo," or "Button" — just by defining which fields your module needs and what its HTML template looks like. The plugin generates the PHP code Beaver Builder needs behind the scenes.
- No coding required: the visual builder lets you assemble your module's fields by dragging and dropping, the same way you build a page with Beaver Builder.
- An advanced mode for editing the raw JSON by hand, for anyone who already knows Beaver Builder's field format or needs an option the visual builder doesn't expose yet.
- A REST API to create and update modules programmatically — including from an AI assistant or a script.
- 9 field types covering text, rich content, media, color, dates, links, and time zones.
- Install and activate the plugin (Requirements & installation).
- Go to NuboCoder BB Simple Modules → Add New Module and give it a title (Your first module).
- Drag fields onto the builder from the palette on the right (The 9 field types).
- Write the Front HTML using
{field_name}placeholders, then hit Publish.
2Requirements & installation
| Requirement | Version |
|---|---|
| WordPress | 4.7 or later |
| PHP | 5.6 or later |
| Beaver Builder | Any recent version (Pro or Lite). Without Beaver Builder installed and active, the plugin has nothing to do — modules still save, but they never appear in any page builder. |
Beaver Builder has to be installed and active for your modules to show up in the page builder's module panel. You can create and edit modules without Beaver Builder active, but you won't be able to use them on any page until you activate it.
2.1 Installation
- Download the plugin (
.zip) or clone the repository intowp-content/plugins/. - From the WordPress dashboard, go to Plugins → Add New → Upload Plugin (if you have the
.zip), or activate it directly from Plugins if it's already in the right folder. - Click Activate.
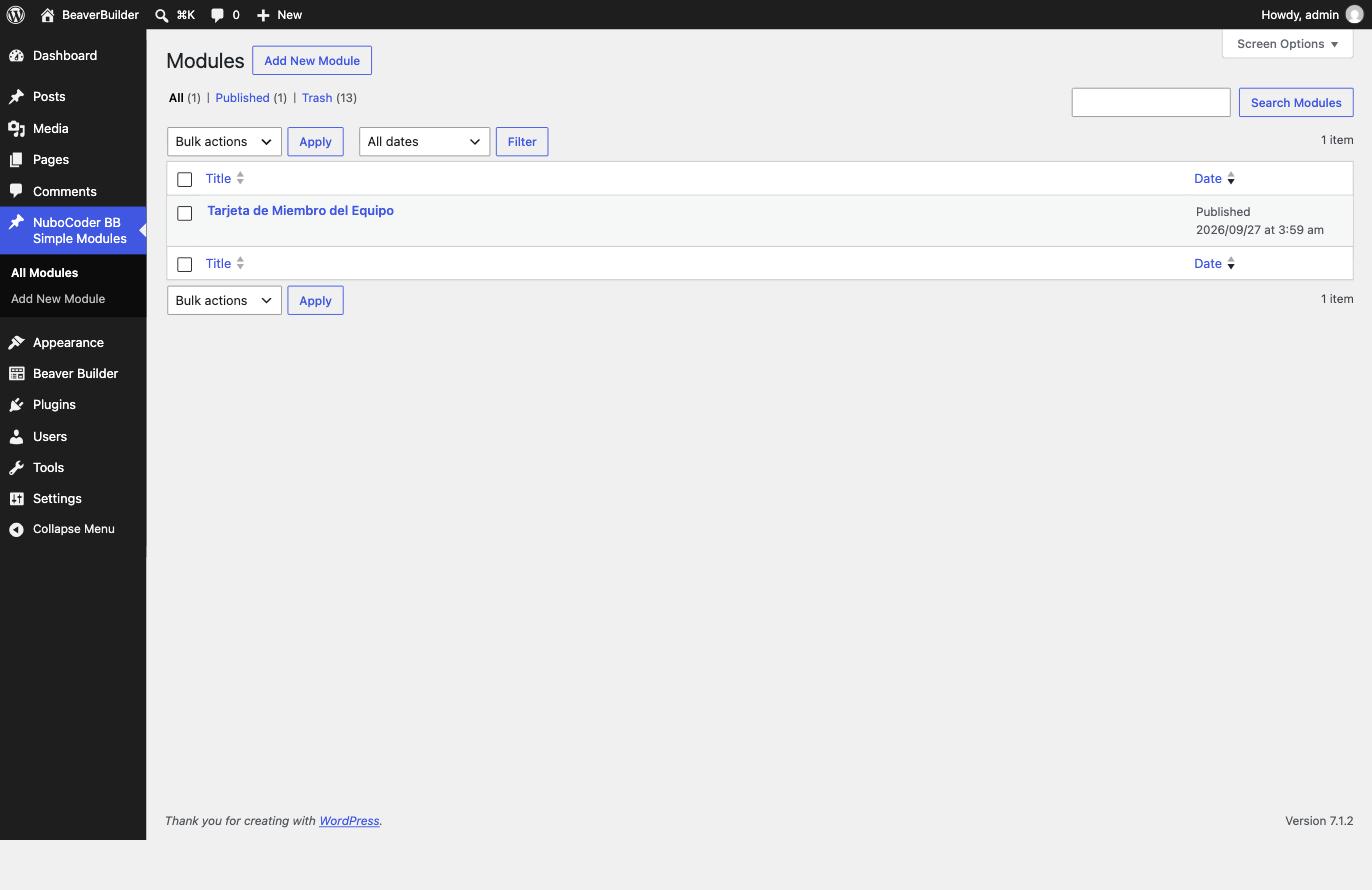
Once activated, you'll see a new menu item in the dashboard sidebar: NuboCoder BB Simple Modules. That's where you'll spend most of your time using the plugin.
2.2 What does the plugin install?
On activation, the plugin automatically creates:
- An example module ("NuboCoder BB Example Module") demonstrating the available field types — useful as a reference; keep it, edit it, or delete it freely.
- An internal folder (
wp-content/nubocoder/bb-simple-module-creator/modules/) where the plugin stores the PHP code it auto-generates for each module you create. You never need to touch anything there — it's entirely internal.
Creating, editing, or deleting modules requires the site's Administrator role. This is intentional: every module generates a PHP file on the server, so the plugin restricts that capability to the highest level of trust available.
3Your first module
We're going to build a "Team Member Card" module: a block with a name, job title, bio, and a brand color, meant for a "Meet the Team" page. It's the same example used throughout the rest of this guide.
Step 1 — Create the module
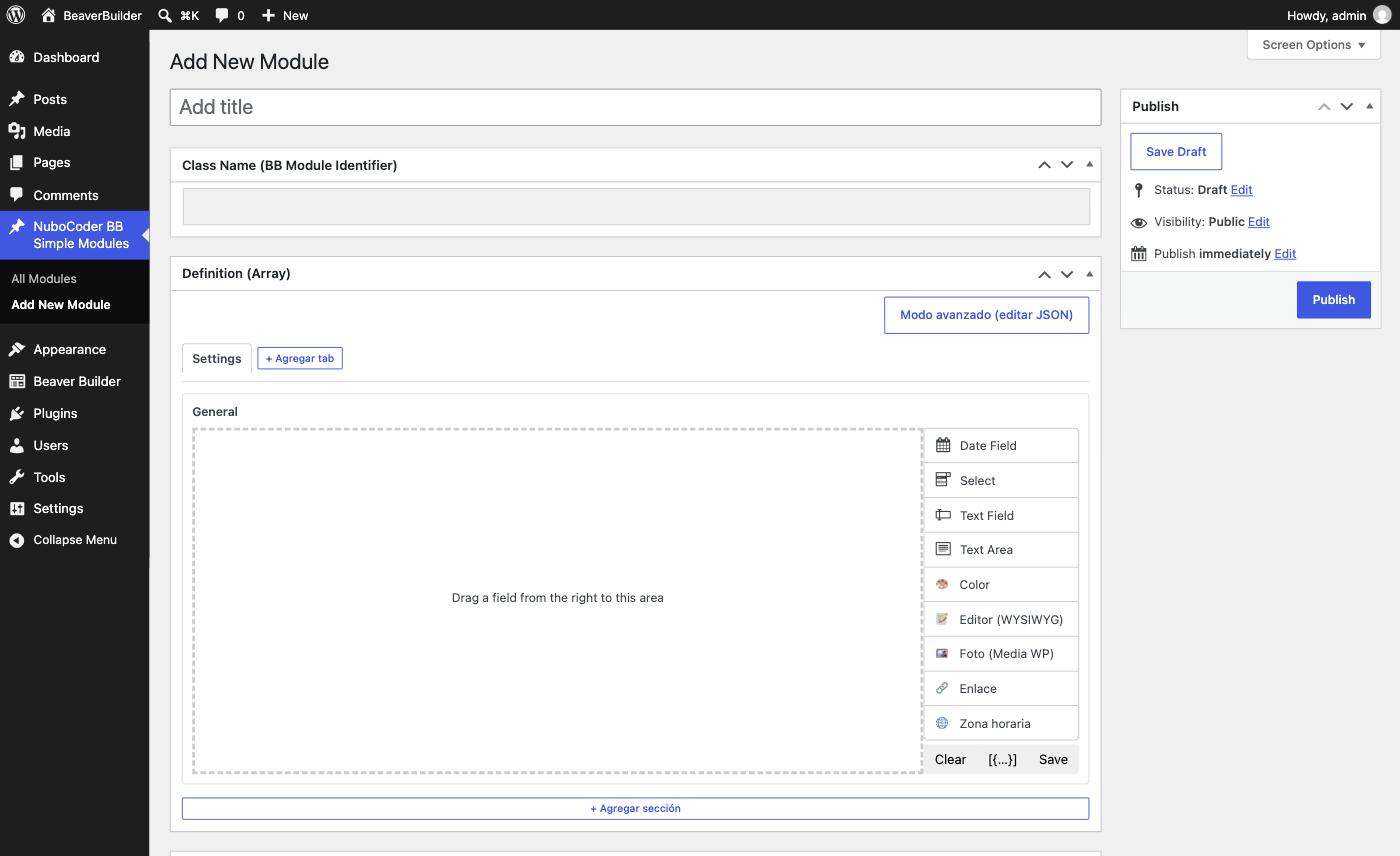
Go to NuboCoder BB Simple Modules → Add New Module. You'll see three blocks: the title, the class name (read-only, filled in automatically), the Definition block (where you build the fields), and the Front HTML block (where you build the visual template).
Type a title for your module — for example, "Team Member Card". This title is the name you'll later see in Beaver Builder's module panel.
Step 2 — Add fields
Drag the fields you need from the palette on the right into the dashed drop area. For our team card, we'll add:
- Text Field → named "Name"
- Text Field → named "Job Title"
- Text Area → named "Short Bio"
- Select → named "Department," with options Design / Development / Marketing
- Color → named "Brand Color"
For each field, click the pencil icon (✏️) that appears on hover to open its settings panel: there you set the label (what you see in this editor), the name (the internal key — more on this in the next section), and that field type's own options.
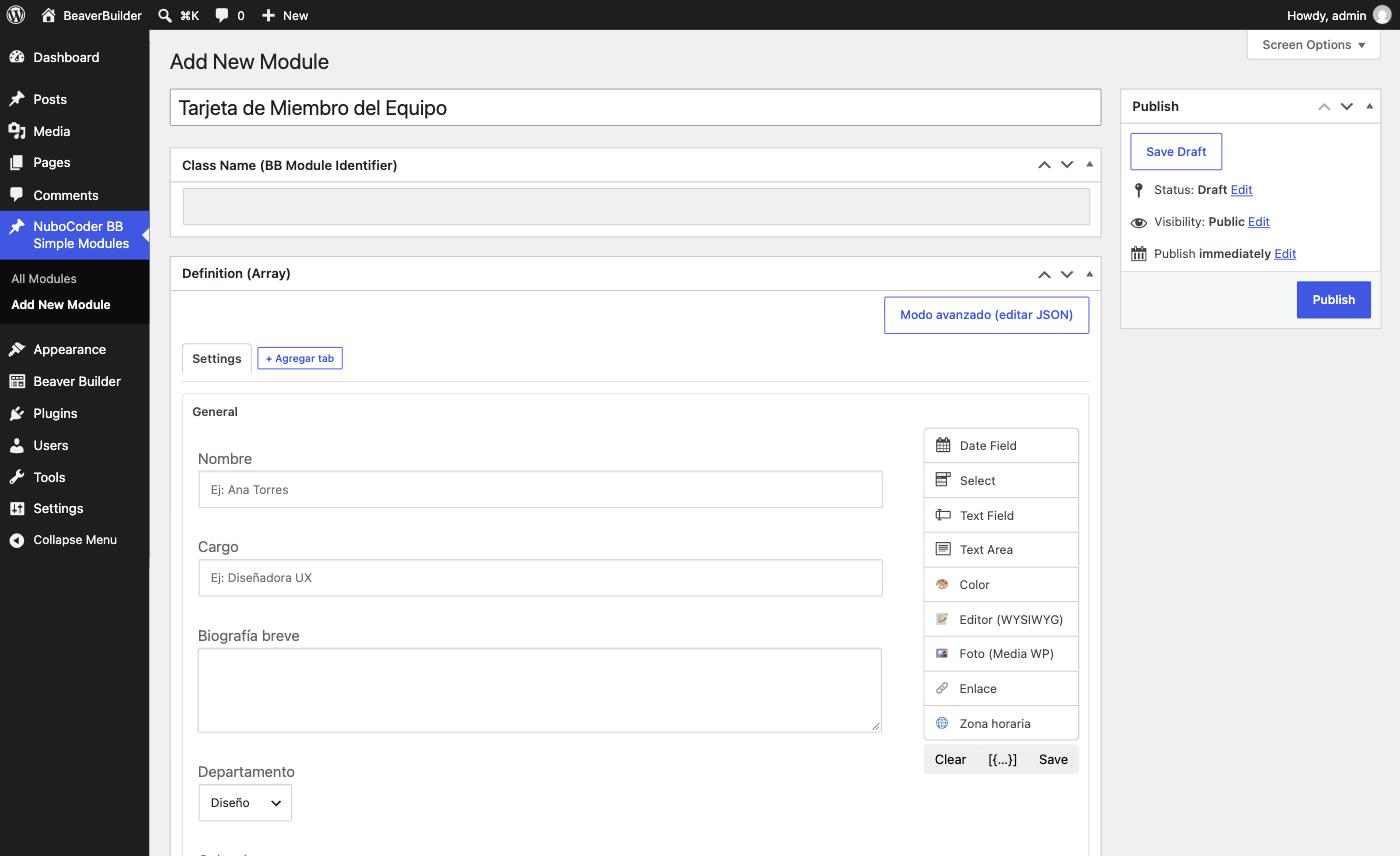
A field's name (not its label) is what you'll later use as a placeholder in the HTML — a field named job_title is referenced as {job_title}. The plugin generates it automatically from the label, but you can change it to whatever you prefer.
Step 3 — Organize into tabs (optional)
If your module has many fields, you can group them into different tabs and sections, the same way any settings panel with multiple tabs works. Click "+ Add Tab" to create a new tab, and "+ Add Section" to add more sections inside the active tab.
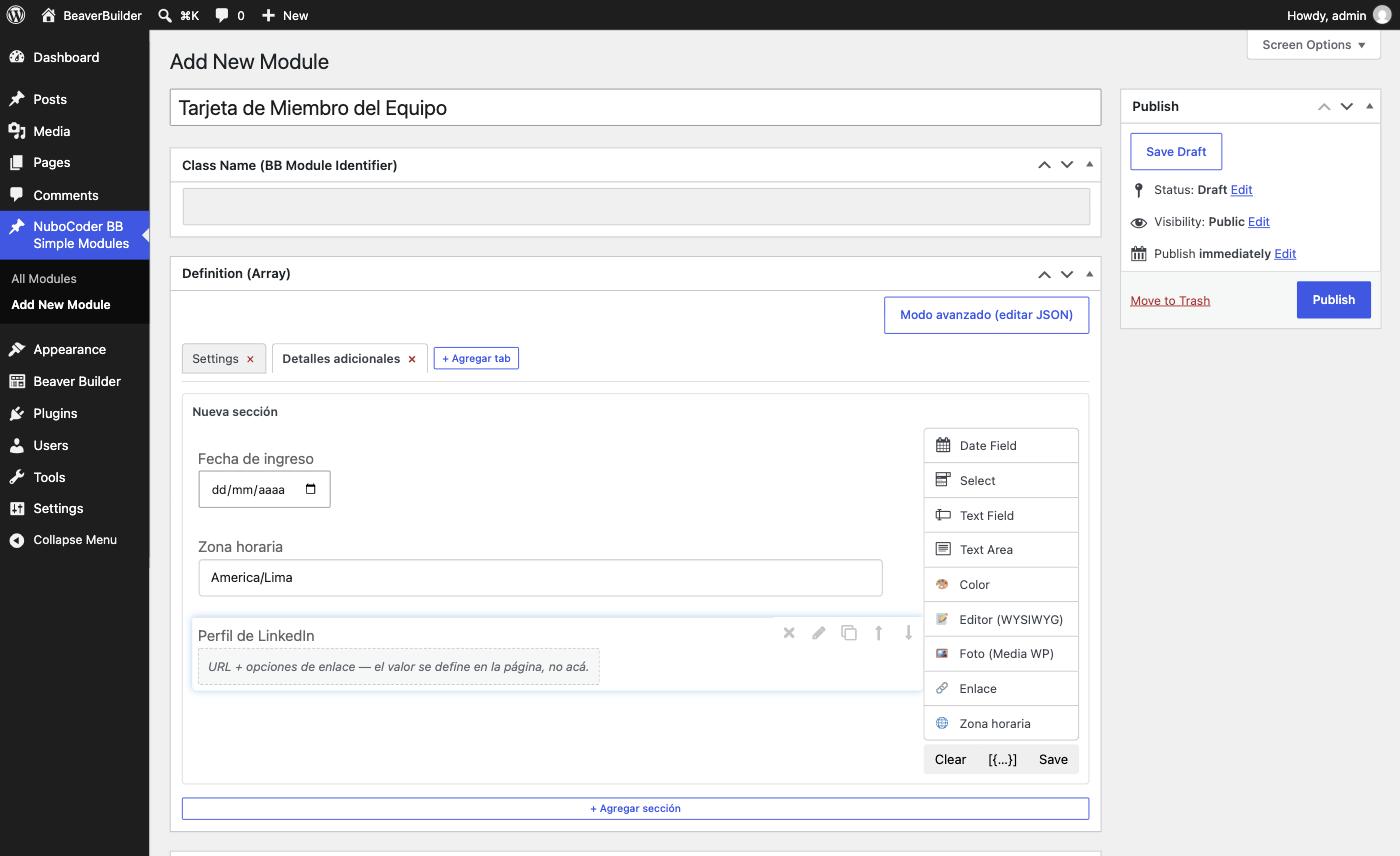
To rename a tab or section, double-click its name. The ▲▼ buttons reorder sections within a tab, and the ✕ deletes a tab or section (there's always at least one of each left).
Step 4 — Write the module's HTML
Scroll down to the Front (HTML) block. This is where you write the HTML that will show up on the page, using {field_name} wherever you want a field's value to appear. The "Available Fields" panel on the right lists every field you've defined (across all tabs) — click any of them to insert it at the cursor's position.
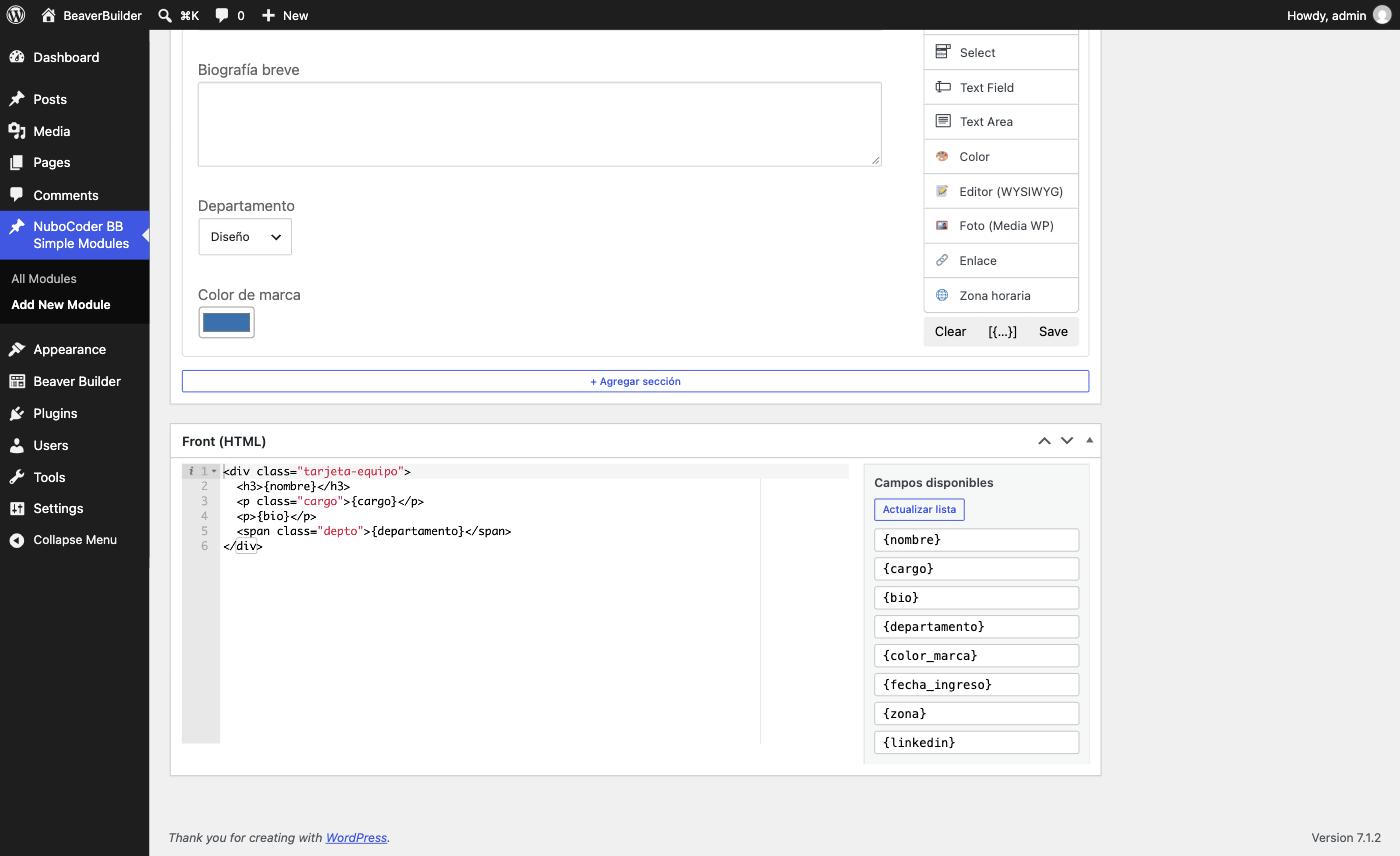
For our example, the HTML could look like this:
<div class="team-card">
  <h3>{name}</h3>
  <p class="job-title">{job_title}</p>
  <p>{bio}</p>
  <span class="department">{department}</span>
</div>
Step 5 — Publish
Click Publish (top right). The plugin automatically generates the module's class name and the PHP file Beaver Builder needs — there's nothing else to do.
The most common one is "Front must be valid HTML" — it happens when WordPress modifies your HTML for security while sanitizing it (single quotes in style="...", disallowed attributes, etc.) and the plugin detects the difference. See the FAQ entry about this error for the full detail and how to avoid it.
Step 6 — Use it on a real page
Go to Pages → Add New, choose "Launch Beaver Builder," and search the module panel for your module under the "NuboCoder Simple Module Creator" category (at the end of the category list). Drag it onto the page.
Beaver Builder will automatically show a settings panel with exactly the fields you defined — including tabs, if you built more than one — where you fill in the real values for that instance of the module.
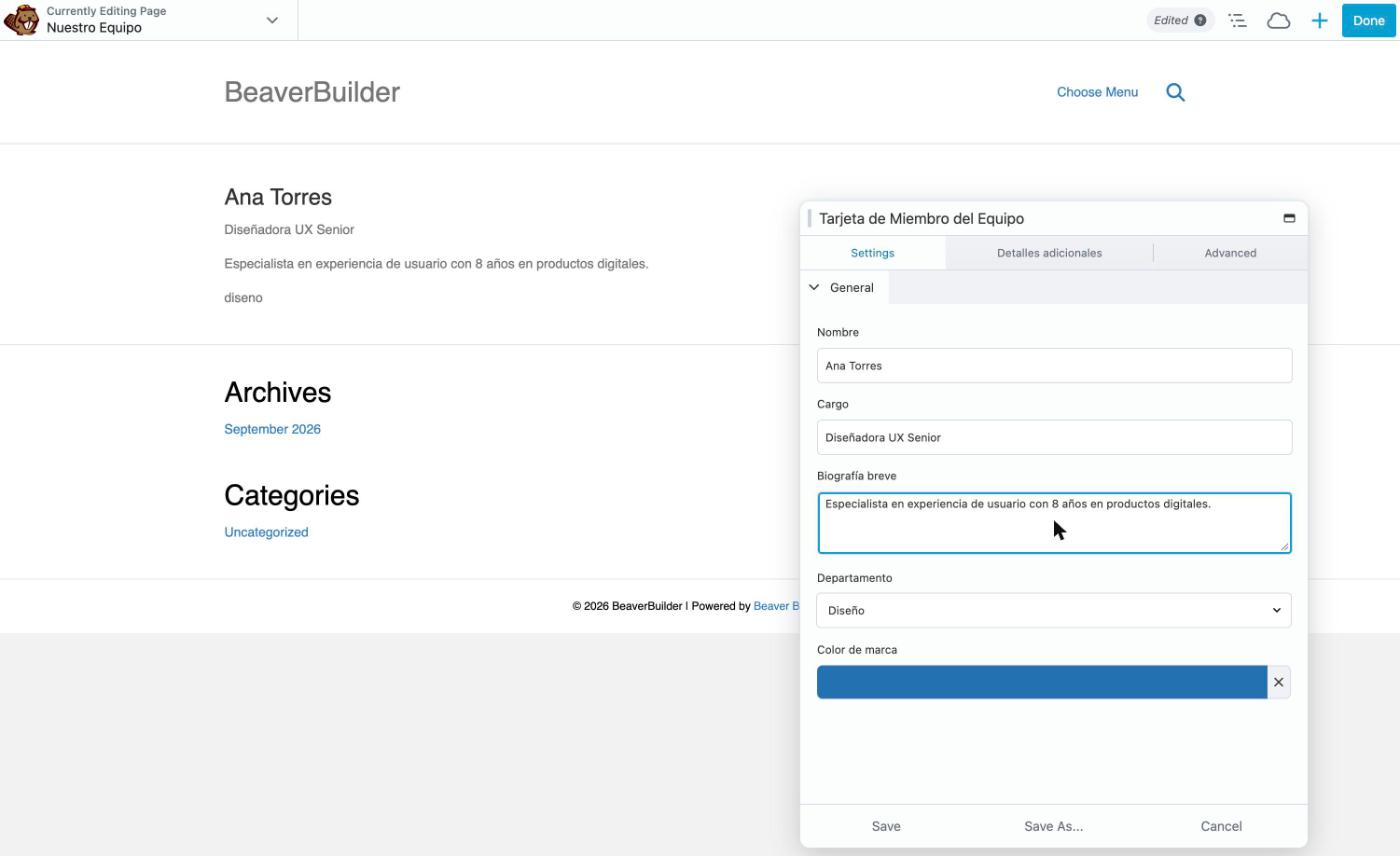
Fill in the fields, click Save, then Publish the page. Here's what the final result looks like to any visitor:
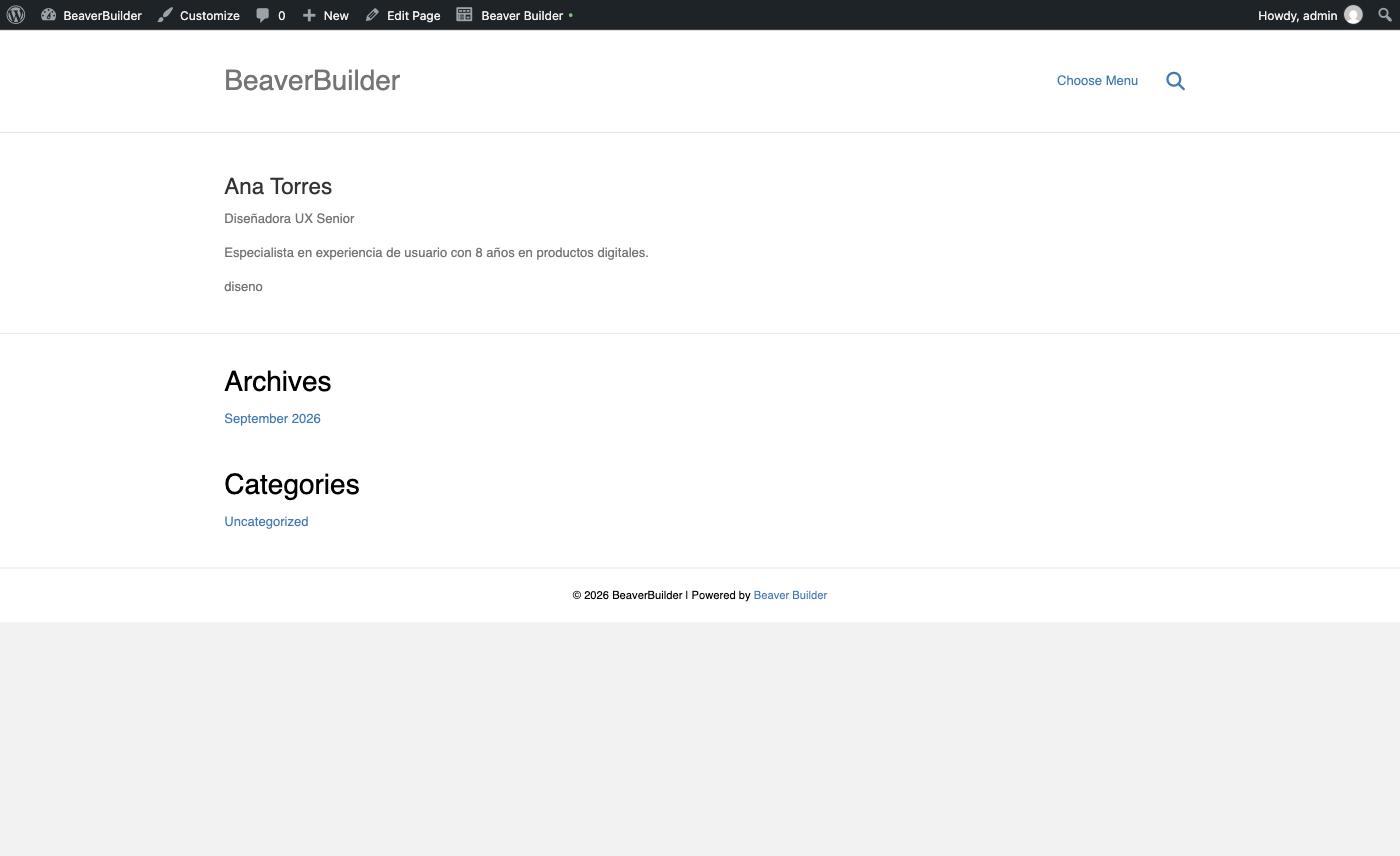
You now have a working module, end to end. The next chapters go deeper into each piece: the 9 available field types, how to organize large modules, and what to do if you'd rather edit the JSON by hand.
4Tabs & sections
Every module has, at minimum, one tab ("Settings" by default) with one section ("General" by default). If your module is simple, you don't need to touch any of this — just add your fields there and you're done. This section is for when your module starts growing.
4.1 What are tabs and sections for?
They're purely organizational — they don't change how the module works, only how its settings panel looks in Beaver Builder. Tabs show up as tabs across the top of the settings panel; sections show up as collapsible blocks within each tab. It's the exact same organization Beaver Builder's own native modules use (the "Button" module, for example, has "General," "Style," and "Advanced" tabs).
4.2 Adding and removing tabs
- Add: click "+ Add Tab," to the right of the existing tabs. The new tab is created with an empty section and activates automatically.
- Rename: double-click the tab's name — it turns into an editable text field. Type the new name and press Enter (or click away).
- Delete: click the tab's ✕. Only available when there's more than one tab — a module always needs at least one.
4.3 Adding and removing sections
Within the active tab, click "+ Add Section" to add another section. Each section has its own field drag-and-drop area, fully independent of the others.
- Rename: double-click the section's title, same as tabs.
- Reorder: the ▲ and ▼ buttons in a section's header move it up or down within the same tab.
- Delete: the ✕ in the header — available only when the tab has more than one section.
Even though fields may live in different tabs or sections, they all end up forming one single list of values once the module is used on a page. If two fields share the same name — even across different tabs — only the first one you created will work; the plugin automatically ignores any duplicate to stop one field from silently overwriting another's value.
4.4 When is it worth using multiple tabs?
There's no fixed rule, but as a reference: Beaver Builder's native modules tend to separate "what content shows" (one tab) from "how it looks" (another tab, with colors, sizes, etc.). If your module has more than 6–8 fields, grouping them into two or three themed tabs usually makes it much easier for whoever builds the page later — even if that person is you, a few months from now.
5The 9 field types
All fields share a few basic options, available in the edit panel (✏️ icon) of any field:
| Option | What it does |
|---|---|
| Required | Marks the field as required in the Beaver Builder panel. |
| Label | The text seen by whoever uses the module in Beaver Builder. |
| Help Text | Extra help text for that field. |
| Name | The field's internal key — the one you use as a {placeholder} in the HTML. Generated automatically from the label, but editable. |
| Class | An optional CSS class for the field (advanced use). |
5.1 The 9 types
| Field type | What it's for | Own options |
|---|---|---|
| 📝 Text Field | A single line of text. Ideal for names, short titles, job titles. | placeholder (example text), value (default value). |
| 📄 Text Area | Multiple lines of plain, unformatted text. Ideal for bios, descriptions, short paragraphs. | rows (box height), maxlength (max length). |
| ▾ Select | A dropdown of fixed options. Ideal for categories, departments, priorities. | Configure options (label + value) right in the field panel with the "Add Option" button. The option marked as selected becomes the default. |
| 📅 Date Field | The browser's native date picker. | Min / Max (allowed date range). |
| 🎨 Color | A color picker. In the visual builder it shows as a simple color input; in Beaver Builder's real panel, your module uses Beaver Builder's own native color picker (with palette, history, etc.). | Value (default color), Show Reset / Show Alpha — type any text (e.g. 1) into either box to enable it, leave it empty to disable it. |
| 📝 Editor (WYSIWYG) | A full rich-text editor (like the WordPress post editor). The final value can include bold text, links, lists, etc. — rendered as real HTML on the front end, not plain text. | Show "Add Media" button and Auto-format paragraphs (wpautop) — same as above, type any text to enable them. The editor's actual content is set on the page, when the module is used — the visual builder only defines that the field exists and how it behaves. |
| 🖼️ Photo (WP Media) | An image picker connected to the WordPress Media Library. | Show "Remove Image" button. As with the editor, the actual photo is chosen on the page, not in the builder. |
| 🔗 Link | A URL field with extra behavior options. | Show "Open in new tab" option, Show "rel=nofollow" option, Show "Force download" option. The URL itself is filled in on the page — these checkboxes only control which extra options whoever uses the module sees. |
| 🌐 Time Zone | A dropdown listing every time zone PHP recognizes (e.g. America/Lima, Europe/Madrid). | Value (default time zone — UTC if none is chosen). |
Editor, Photo, and Link intentionally have no configurable value here: the real content (the editor's text, the image, the URL) is filled in per module instance, directly on the page where it's used — there's no point defining "the default photo" for a field type that's going to be different on every page. The visual builder only defines what kind of control the page builder will see, and what extra options it has available.
6HTML & placeholders
The Front (HTML) block below the visual builder is where you define what your module looks like. It's regular HTML, with one special rule: any {field_name} gets replaced, when the page renders, with that field's real value.
6.1 The "Available Fields" panel
To the right of the HTML editor is a panel listing, in real time, the {name} of every field in the module — from all tabs, not just the one currently open. Click any of them to insert it at the cursor's position inside the HTML editor.
If you added, renamed, or deleted fields and the list didn't refresh on its own, use the "Refresh List" button.
6.2 Rules for the HTML
- You can use any regular HTML tag:
div,p,h1–h6,span,img,a, lists, etc. - Tags like
<script>and attributes likeonclickaren't allowed — WordPress strips them automatically for security, and the plugin warns you with an error if that happens on save. A well-formedstyle="..."(double quotes, safe CSS properties) is allowed; see the FAQ entry on "Front must be valid HTML" for the exact cases that trigger it. - The same field can be used more than once in the HTML (e.g.
{name}in the title and again inside analtattribute). - If a placeholder doesn't match any real field, it's shown as-is, as literal text — it never causes an error.
6.3 How is each field type processed?
For security, each field's value is processed differently depending on its type before it's inserted into the page:
| Field type | How it's rendered |
|---|---|
| All, except Editor | As safe, plain text — any HTML someone types in there (by accident or on purpose) is neutralized and never executed. |
| Editor (WYSIWYG) | As real HTML (bold text, links, lists, etc. are respected), filtered through WordPress's standard security rules — the same as content in any post or page. |
A plain text field isn't meant to carry HTML — if someone fills "Name" with something unusual, showing it as-is (without executing anything) is the safest, most predictable behavior. The Editor field, on the other hand, exists specifically to carry formatted content, so it's allowed the same safe HTML that WordPress allows in any post.
6.4 Full example
Back to the Team Member Card module:
<div class="team-card">
  <h3>{name}</h3>
  <p class="job-title">{job_title}</p>
  <p>{bio}</p>
  <span class="department">{department}</span>
</div>
When someone uses this module on a page and fills "Name" with Ana Torres, "Job Title" with Senior UX Designer, and so on, the front-end result is:
7Advanced mode & migration
7.1 What is "Advanced Mode"?
It's a text editor where you view and edit directly the JSON that Beaver Builder uses internally to define a module's fields — the same format Beaver Builder uses for its own native modules. It's turned on with the "Advanced Mode (edit JSON)" button, at the top right of the Definition block.
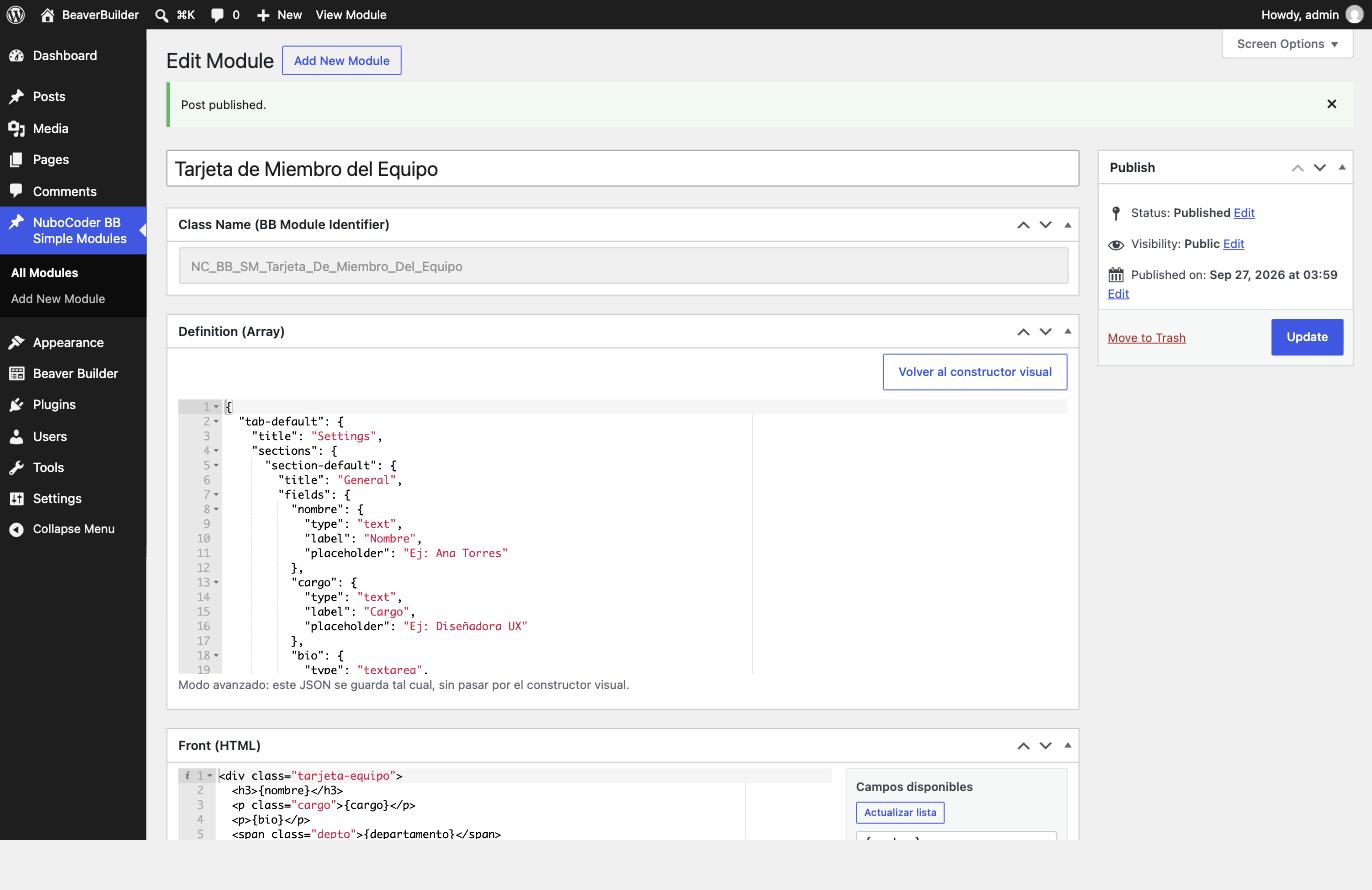
It's useful when:
- You already know Beaver Builder's field format and prefer writing it directly.
- You need a field type or option the visual builder doesn't support yet (for example, conditional fields shown or hidden based on another option —
toggle). - You're copying a definition from another module or from Beaver Builder's own documentation.
7.2 Switching modes without losing changes
You can move back and forth between the visual builder and advanced mode without saving — the plugin automatically syncs whatever you did in one mode into the other at the moment you switch:
- Visual → advanced: the JSON editor updates to reflect exactly the fields you built in the visual builder.
- Advanced → visual: the plugin tries to translate your JSON back into the visual builder. If it can, you'll see your fields reflected there, with their tabs and sections. If the JSON uses something the visual builder doesn't recognize (the
toggletype, for example), the switch is blocked with a warning — your JSON is left untouched and nothing is lost, you simply keep editing it in advanced mode.
This sync exists precisely so you never lose work by switching modes by accident. If the visual builder ever "can't" display your JSON, the full JSON is still available in advanced mode.
7.3 Opening an old module (automatic migration)
If you had modules created before the visual builder existed (or always built by hand in advanced mode), there's no need to rewrite them: opening one like that, the plugin tries to migrate it automatically to the visual builder the first time you open it.
- If every field in the module uses a type the visual builder recognizes, it opens directly in visual mode, fully built out — tabs, sections, default values included.
- If any field uses an unsupported type (like
toggle), the module opens in advanced mode, with a notice explaining why it couldn't migrate. The JSON stays intact, and you can keep editing it there without any issue.
This migration is intentionally "all or nothing": the plugin would rather not touch anything than migrate a module halfway and have you lose a field without realizing it.
7.4 JSON format
If you want to write the JSON by hand, the structure is always: tabs → sections → fields, where each level is an object whose key is an identifier and whose value has a title (for tabs and sections) or the field's own properties (for fields).
{
  "my-tab": {
    "title": "Settings",
    "sections": {
      "my-section": {
        "title": "General",
        "fields": {
          "my_field": {
            "type": "text",
            "label": "My Field",
            "default": "Initial value"
          }
        }
      }
    }
  }
}
For the full detail on what options each type accepts (color, select, editor, etc.), see the field types reference — the same options you see in the visual builder are the keys you'll use here.
8REST API for integrations
Create, read, update, and delete modules over HTTP — without opening the WordPress dashboard. Built for your own scripts, and so an AI agent can operate the plugin directly.
8.1 What's it for?
Everything you can do on a module's edit screen (create it, define its fields, write the front HTML, publish it, delete it) can also be done with plain HTTP requests to the REST API the plugin ships with. The exact same saving, sanitization, and PHP class-generation logic the classic edit screen uses is what runs behind this API — it isn't a separate path with fewer checks, it's literally the same function.
Give your AI assistant this site's URL and an application password (see below), and ask it something like "create a module called Testimonial with a text field for the name and a textarea for the quote." The agent builds the JSON and sends the POST — it doesn't need to know anything about PHP or Beaver Builder.
8.2 Authentication
The API uses Application Passwords, a WordPress core feature (since version 5.6) — nothing extra to install, no custom key system. Each application password is independent from your real password, can be revoked at any time without affecting your normal login, and is tied to one specific user (so it inherits that user's permissions).
How to generate one
- Log in to the WordPress dashboard with an Administrator account (see below for why it has to be an admin).
- Go to Users → Profile (or Users → All Users → [your user] on multisite).
- Scroll to the Application Passwords section.
- Type a name that'll help you identify it later (e.g.
AI Agent - modules) and click Add New Application Password. - WordPress shows you the password only once, in groups of 4 characters. Copy it right then — there's no way to see it again later (you can only revoke it and create a new one).
Whoever has this password can create, modify, and delete modules — and every module generates a PHP file that WordPress executes. Don't share it in plain text, don't commit it to a public repository, and revoke it from Users → Profile the day you stop needing it.
How to use it
With HTTP Basic Auth: your WordPress username as the user, and the application password (with or without the spaces) as the password. With curl:
curl -u "your_user:xxxx xxxx xxxx xxxx xxxx xxxx" \
https://yoursite.com/wp-json/nubocoder-bb-sm/v1/modulesHTTP Basic Auth sends the username and password on every request. On a site without HTTPS, they travel unencrypted. Local development sites (like .local) are the usual exception; on any real site, this requires HTTPS.
Why administrators only?
Every endpoint requires the same permission the classic edit screen already requires: manage_options, the Administrator permission. It's not a new or stricter restriction than the rest of the plugin — it's the same one, applied consistently, because creating or modifying a module always ends up generating PHP code on the server. An unauthenticated request, or one authenticated as a non-administrator, gets a 401 error.
8.3 API base
Every endpoint hangs off:
/wp-json/nubocoder-bb-sm/v1/modules8.4 Endpoints
List modules
| Method | Route | Returns |
|---|---|---|
GET | /modules | Every published or draft module (excluding trashed ones), ordered by title. |
curl -u "admin:xxxx xxxx xxxx xxxx xxxx xxxx" \
https://yoursite.com/wp-json/nubocoder-bb-sm/v1/modules[
{
"id": 45,
"title": "Team Member Card",
"status": "publish",
"class_name": "NC_BB_SM_Team_Member_Card",
"modified": "2026-09-27 03:59:10"
},
{
"id": 60,
"title": "Promo Banner",
"status": "draft",
"class_name": "NC_BB_SM_Promo_Banner",
"modified": "2026-09-27 04:22:30"
}
]class_name is the module's PHP class name / internal identifier. It's generated once, from the title at that moment, and doesn't change even if you rename the module later — changing it would break any page already using that module.
View a full module
| Method | Route | Returns |
|---|---|---|
GET | /modules/{id} | All of a module's data: field definition, front HTML, etc. |
curl -u "admin:xxxx xxxx xxxx xxxx xxxx xxxx" \
  https://yoursite.com/wp-json/nubocoder-bb-sm/v1/modules/52
The response carries the same fields as the create response (see below), plus edit_link with a direct URL to the classic edit screen in the dashboard. An id that doesn't exist (or is trashed) returns 404.
Create a module
| Method | Route |
|---|---|
POST | /modules |
Parameters (all in the JSON body):
| Field | Required | Description |
|---|---|---|
title | Yes | The module's title — also the name shown in Beaver Builder's panel. |
status | No | publish (default) or draft. |
builder_config | No | The visual builder's config. See "builder_config vs. definition" below — this is the recommended way. |
definition | No | Raw Beaver Builder JSON (the same format used by advanced mode). Only needed for something the visual builder doesn't support. |
front | No | The template HTML, with {field_name} placeholders — see HTML & placeholders. |
If you send neither builder_config nor definition, the module is still created, with zero fields — you can add them later with an update POST.
curl -u "admin:xxxx xxxx xxxx xxxx xxxx xxxx" \
  -X POST https://yoursite.com/wp-json/nubocoder-bb-sm/v1/modules \
  -H "Content-Type: application/json" \
  -d '{
    "title": "Customer Testimonial",
    "builder_config": {
      "tabs": [{
        "id": "tab-1",
        "title": "Content",
        "sections": [{
          "id": "section-1",
          "title": "Details",
          "fields": [
            { "name": "name", "type": "text", "label": "Name" },
            { "name": "quote", "type": "textarea", "label": "Quote" }
          ]
        }]
      }]
    },
    "front": "<blockquote>{quote}<footer>{name}</footer></blockquote>"
  }'
201 response:
{
  "id": 52,
  "title": "Customer Testimonial",
  "status": "publish",
  "class_name": "NC_BB_SM_Customer_Testimonial",
  "definition": { "tab-1": { "title": "Content", "sections": { "...": "..." } } },
  "builder_config": { "tabs": [ { "...": "..." } ] },
  "front": "<blockquote>{quote}<footer>{name}</footer></blockquote>",
  "edit_link": "https://yoursite.com/wp-admin/post.php?post=52&action=edit",
  "modified": "2026-09-27 04:18:05"
}
If something isn't valid (for example the front HTML fails validation — see the FAQ entry on "Front must be valid HTML"), the API responds with 400 and the same message you'd see on the classic screen, and it doesn't leave a half-created module behind: if validation fails, the module that was just created is fully deleted within the same request.
Update a module
| Method | Route |
|---|---|
POST / PUT / PATCH | /modules/{id} |
Accepts the same fields as creation, but all of them are optional: anything you don't send stays exactly as it was. This request, for example, only changes the title — the HTML, fields, and module status stay untouched:
curl -u "admin:xxxx xxxx xxxx xxxx xxxx xxxx" \
  -X POST https://yoursite.com/wp-json/nubocoder-bb-sm/v1/modules/52 \
  -H "Content-Type: application/json" \
  -d '{ "title": "Featured Testimonial" }'
The response is the full, updated module, in the same format as the create response.
Delete a module
| Method | Route |
|---|---|
DELETE | /modules/{id} |
By default it moves the module to the trash (same as the dashboard's "Move to Trash" button) — it can be restored later, and the class file isn't touched yet:
curl -u "admin:xxxx xxxx xxxx xxxx xxxx xxxx" \
  -X DELETE https://yoursite.com/wp-json/nubocoder-bb-sm/v1/modules/52
{ "deleted": true, "id": 52, "trashed": true }With ?force=true, it's deleted permanently — including its PHP class file — same as "Delete Permanently" from the dashboard's trash. This action can't be undone.
curl -u "admin:xxxx xxxx xxxx xxxx xxxx xxxx" \
  -X DELETE "https://yoursite.com/wp-json/nubocoder-bb-sm/v1/modules/52?force=true"
{ "deleted": true, "id": 52, "trashed": false }8.5 builder_config vs. definition
There are two ways to describe a module's fields, and they're the same two that already exist on the edit screen:
builder_config— the recommended way. It's the visual builder's config: a simple list of tabs, sections, and fields, where each field has atypethe server validates against the 9 supported types. If you send something that isn't a valid type, that field is discarded rather than saved incorrectly.definition— raw Beaver Builder JSON, same as advanced mode. It's an escape hatch: it lets you use any option Beaver Builder supports even if the visual builder doesn't have it yet (conditional fields withtoggle, for example). In exchange, there's no type validation — you're responsible for the JSON being correct.
Send one or the other, never both at once — if you send builder_config, that's the one used. To update existing fields in advanced mode, start with a GET on the module and use its current definition as your starting point.
8.6 Errors
Every error returns a JSON body shaped the same way as any WordPress REST API endpoint:
{
  "code": "ncbbsm_rest_not_found",
  "message": "Module not found.",
  "data": { "status": 404 }
}| Code | HTTP | When it happens |
|---|---|---|
ncbbsm_rest_forbidden | 401 | Unauthenticated, or authenticated as a non-administrator. |
rest_missing_callback_param | 400 | Missing title when creating a module (WordPress catches this before the request reaches the plugin). |
ncbbsm_rest_missing_title | 400 | An empty title (e.g. "") was sent when creating or updating. |
ncbbsm_rest_invalid_module_data | 400 | The front HTML isn't valid, or builder_config/definition isn't well-formed JSON. The message carries the exact detail. |
ncbbsm_rest_not_found | 404 | The id doesn't exist, isn't a module, or is trashed. |
ncbbsm_rest_delete_failed | 500 | WordPress couldn't complete the deletion (rare — a file-permission or database issue). |
9Troubleshooting & FAQ
Check, in this order: Beaver Builder is installed and active (modules never appear without it), the module is Published rather than a draft, and you're looking under the "NuboCoder Simple Module Creator" category at the end of the module list.
WordPress sanitizes your Front HTML the same way it sanitizes any post content, and the plugin compares the result against what you typed. The usual causes are single quotes in style="...", double spaces between attributes, an unsafe style value or attribute (like onclick), or a disallowed tag such as <script>. A well-formed style="color: red" with double quotes passes without any error.
Only users with the Administrator role can create, edit, or delete modules — that's intentional, since every module generates PHP code on the server. If you are an administrator and still can't, check whether another security plugin is restricting custom capabilities.
Yes, but remember to update the matching placeholder in the HTML too — the plugin doesn't do that automatically. If you rename a field, the old placeholder (e.g. {old_name}) is left showing as literal text instead of being replaced.
Only the first one you created (reading top to bottom, tab by tab) will work — the second is ignored on save. This is intentional: every field in a module, regardless of which tab it lives in, shares one single namespace. Give them different names (e.g. name and name_2) if you need to tell them apart.
Dragging a field from the palette doesn't work. Native drag-and-drop can occasionally fail in some browsers or with certain extensions active — reload the page and try again, check whether a browser extension is intercepting drag events, or test in a private/incognito window to rule out extension conflicts.
I deleted a module by mistake. Modules are just another WordPress content type, so deleting one sends it to the Trash first (from the module list) — you can restore it from there as long as you haven't permanently deleted it. Permanently deleting a module also deletes the PHP file the plugin generated for it; if you'd restored it from the trash before that, there's no issue — the file is regenerated on the next save.
Does the plugin work with Beaver Builder Lite (the free version)? Yes. Modules created with this plugin are standard Beaver Builder modules — they work identically with Lite or Pro.
10Changelog highlights
Visual builder (drag and drop)
Previously, creating a module meant hand-writing the field-definition JSON and the template HTML — built for someone who already knew Beaver Builder's internal format. The visual builder replaces that manual editing with a drag-and-drop interface, without losing the ability to edit the JSON by hand when needed (see Advanced mode).
Tab & section organization
Modules with many fields can be grouped into several tabs and sections, just like Beaver Builder's own native modules. See Tabs & sections.
9 field types
The visual builder supports the same field types Beaver Builder offers natively: text, text area, select, date, color, rich-text editor, photo, link, and time zone. See The 9 field types.
Sync between visual and advanced modes
Switch between modes at any time without losing changes — each mode updates to reflect the other's current state before it's shown.
Automatic migration of older modules
Modules created before the visual builder existed (or always built by hand) migrate automatically when opened, as long as their definition uses only field types the builder recognizes.
REST API for integrations (new)
Added an API to create, read, update, and delete modules programmatically, built to integrate with your own scripts or with AI assistants. See REST API for integrations for the full detail.
Security
Throughout these improvements, several security points across the plugin were reviewed and hardened: sanitizing everything saved to the database, verifying permissions on every action, and a full audit following WordPress's official plugin-development best-practices tooling. The goal in every case is the same: what you see on the front end is always exactly what you defined, with no surprises.
11Support
For questions or custom requirements, contact the plugin's author at zed.1985@gmail.com.
Need something built on top of this?
If you need a custom field type, an integration with your own tooling, or a completely custom Beaver Builder module built for your project, I'm available for that work.
Tell me about your project.
I respond and manage projects autonomously within one business day. If we're a fit, we'll book a 30-minute call to go deeper.
Email me directly
A short note about your project, your timeline, and what success looks like. The more context, the better.
cesar@cesarsiancas.com Already know what you want?Book a 30-min call
Skip the back-and-forth. Pick a slot in my calendar and we'll talk through scope, timeline, and budget.
calendly.com/zed-1985/30min Hiring through a platform?Find me on Toptal
I'm a vetted Top 3% engineer on Toptal. If your company already has a contract there, we can start within days.
toptal.com/resume/cesar-siancas